


Contributing Writer

FIGURE 1A. This CAD model represents a routine CAD project. It has several features that are impractical for fabrication. However, it is handy as a starting point. This adapt-from-a-starting-point approach can be a time-saving trick when 3D modeling.
Editor’s Note: CAD files associated with this column can be downloaded here.
The 3D CAD model shown in Figure 1A first appeared in a February 2008 column. It is useful as an item that is not likely to conflict with any existing trademarks or patents, but could. The focus at the time was on design for manufacturing (DFM)—specifically, sheet metal fabrication. There are several rules of thumb that are badly bent by this model.
A few improvements are shown in Figure 1B. You’ll see more practical spacing of the louvers, a perf pattern that is more suitable for stamping, and a design that is generally more suitable for forming with common press brake tooling.
For clarity (as clear as weightless aluminum can be), Figure 1C gives a view of the lid in relation to the base. The lid is intended to be retained with dimples that engage with socket holes in the base.
The clamping thumb screw is retained by a swaged-in captive fastener. The jog bend in the hook keeps that (hidden) self-clinching nut from getting in the way of things. The box hooks and clamps to the edge of the cleaning basin or any convenient rail. Figure 1D is a peek at the basket hanging on the edge of a basin.
Even though we, as skilled fabricators, might be able to evaluate the DFM using these illustrations, the purpose of the device is not revealed, and the functionality is merely implied. Of course, in the real world, such disconnect among design, function, suitability, and CAD technique would be avoided with focused planning.
With regard to CAD technique, it is informed and improved with an understanding of the deliverables and what will be done with them. Files, notes, conversations, ideas—those are examples of deliverables.
Turn assumptions into questions. As answers and understanding emerge, careful note-taking and logging become an anchor and asset to collaboration—in other words, part of a billable service.
Our imagined task is to develop and document this product for fabrication. Here, the emphasis is on supporting the development of intellectual property that will be owned by (or at least refined in collaboration with) others.
The completed plan is a touchstone, a means to identify anomalous results, to quantify unsatisfied expectation. Reality demands that the plan be adapted to current events. Change logs and logging are part of the anchor and asset business.

FIGURE 1B. The starting point model has been modified to incorporate some design for manufacturing (DFM) ideas.
Suggested topics to cover in a planning document (a written statement of the problem, solution, and schedule) include exploration; winnowing to an acceptable solution; completion of a virtual prototype; optimization of the design; data entry of production manufacturing information (PMI); release of fabrication drawings; and generation of various STEP files, illustrations, and media.
Alluded to earlier, the answers to the question What is the problem? are needed during planning and account for half of the work in the planning stage. Before an effort like Figure 1C can be useful, a statement of the problem is needed. We offer the following as an example: “Small, precious items are removed for cleaning. A washable enclosure is needed to collect and protect them. The enclosure and its contents will be transported to a cleaning station, submerged, dried, and then returned to the service area for the technician’s convenience during the reassembly process.”
What is the window of opportunity? This is defined by the schedule and the satisfaction of the end user as compared to the available budget for time and capital. If it can’t be done on time at an affordable cost, no further expenditure is needed.
After reviewing the problem, a statement of a proposed solution is prepared. The combination of problem and solution and schedule is the essence of the planning effort.
To complete our example of a proposed solution, we suggest the following:
“A properly sized rectangular enclosure is to be positioned and clamped in position without tools. The lid must be retained by friction, operable with a gloved hand. Ventilation is needed in specific areas on all six surfaces.”
Gaining this understanding of the problems to be solved gives the previous figures more utility. The suitability for function is easier to evaluate. It is not always practical to write the plan to suit the model as we did here, but it is usually possible to illustrate in a note-taking manner based on a stream-of-consciousness flow of goals and constraints.
Illustrations—quick sketches at the early stages—help to focus the iteration to suitable solution and capture the ideal without getting mired in method. These quick concept sketches are simply preliminary, possibly lacking in many ways. The results of planning are more like boundaries than finality.
Recording the best possible results as they are anticipated in notes or drawings, even if they might seem to have extraordinary barriers, supports a winnowing process to a practical solution that captures the best of the window of opportunity. The emphasis here is on noting—note-taking, keeping the illustrations organized, and tracking the critical evaluation points for later decision.
With a few competing possibilities (absurdly ideal solutions) to select from, the associated quick concept sketches morph into concept models and finally into project models. This is where CAD skill—efficient modeling, credible appearance, prudent use of parametric links to control the exploration, disciplined hierarchy to support collaboration and revision—comes into play.

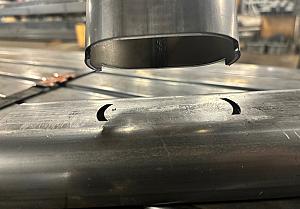
FIGURE 1C. The lid is intended to snap into place. Note the dimples on each end of the lid and sockets in the base. The thumb screw is retained with a self-clinching nut, which is hidden in this view.
Efficient modeling is aided by fluency with the CAD system’s user interface and understanding the problem to be solved and what the ideal solutions might be.
The brand of CAD might be important to consider during the planning process. If all collaborators are on the same platform, the consideration won’t take any time.
One of the milestones is the completion of data entry of the PMI—simple typing of text for descriptions, part numbers, sources, colors, and materials, for example. This PMI labor of love does not need to be postponed. It can and should occur as decisions are made, but it should not take priority over making decisions.
The CAD project will grow a library of components that have their PMI and appearances completed. In addition to stenographer, the role of librarian is vital.
Reporting of the PMI to other interested parties (for instance, purchasing and manufacturing) might require spreadsheets, database bridges, and redundant data entry. If it takes time and is necessary, include it in the plan.
The most acceptable design solution emerges as a compromise between limits on time, cost of production, ideal features, and opportunity cost. The window of opportunity is paramount. It prevents perfection but rewards adequacy.
Fabrication drawings (specifications with 2D illustrations) are critical to making informed accept/reject decisions and are at the core of orderly purchasing and inventory management.
The project planning includes anticipation of a time budget for generation of documents to support fabrication. Identify the drawings that might need full laborious detail as opposed to quick reference to the 3D model for shape and dimensional information.
The security for the project includes planning for divulging the design to third parties. This involves nondisclosure agreements, collaboration method, generation of STEP/STL/IGES files, product glam shots, and related illustrations. STEP files generated for end users or value-added partners are likely to have different levels of detail from those generated for fabrication.

FIGURE 1D. The enclosure, hanging on the rim of a washing basin, doesn’t show the need for the perforated vents, louvers, and other extras. What problems are solved? How are accept/reject decisions made? Is this a good design? Plan to avoid such doubt. Plan to limit risk and misdirection.

The Fabricator is North America's leading magazine for the metal forming and fabricating industry. The magazine delivers the news, technical articles, and case histories that enable fabricators to do their jobs more efficiently. The Fabricator has served the industry since 1970.
start your free subscription


Easily access valuable industry resources now with full access to the digital edition of The Fabricator.

Easily access valuable industry resources now with full access to the digital edition of The Welder.

Easily access valuable industry resources now with full access to the digital edition of The Tube and Pipe Journal.

Easily access valuable industry resources now with full access to the digital edition of The Fabricator en Español.
Desirée Guzmán, a welding instructor with Chicago Women in Trades (CWIT), joins us to talk about her full-circle...


