Research Assistant, ERC/NSM
- FMA
- The Fabricator
- FABTECH
- Canadian Metalworking
Categories
- Additive Manufacturing
- Aluminum Welding
- Arc Welding
- Assembly and Joining
- Automation and Robotics
- Bending and Forming
- Consumables
- Cutting and Weld Prep
- Electric Vehicles
- En Español
- Finishing
- Hydroforming
- Laser Cutting
- Laser Welding
- Machining
- Manufacturing Software
- Materials Handling
- Metals/Materials
- Oxyfuel Cutting
- Plasma Cutting
- Power Tools
- Punching and Other Holemaking
- Roll Forming
- Safety
- Sawing
- Shearing
- Shop Management
- Testing and Measuring
- Tube and Pipe Fabrication
- Tube and Pipe Production
- Waterjet Cutting
Industry Directory
Webcasts
Podcasts
FAB 40
Advertise
Subscribe
Account Login
Search
Continuing the look at die materials and wear in stamping AHSS
Part II: Tests for evaluating galling, wear of tool materials and coatings
- By Eren Billur
- March 9, 2010
- Article
- Metals/Materials
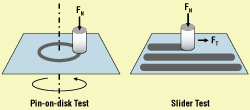
Figure 1 A scratching test determines wear in sliding material pairs, evaluates lubricants, and determines the coefficient of friction.
Stampers have many options for wear testing. Most methods are standardized by ASTM Intl. and are classified into three groups:1
- Evaluating a material's response to a specific type of wear
- Screening materials, lubricants, and coatings
- Investigating fundamental aspects of wear
However, none of the standard tests is specifically tailored to evaluate wear phenomena in sheet metal forming operations. Over the years researchers have modified the standard tests and applied them to evaluate tool materials and coatings in sheet metal forming.
Scratching Test
The standard pin-on-disk test is used to determine wear in sliding material pairs, to evaluate lubricants, or to determine the coefficient of friction (see Figure 1). Since the material pair is in contact with the same surface (which is not the case in sheet metal forming), some modified tests, such as the slider-on-sheet test, were introduced in which tool material is in contact with fresh sheet material throughout the test 2 (see Figure 1).
Although the sliding speeds and normal forces (and therefore the contact pressure) can be adjusted to a level that is similar to sheet metal forming processes, the effect of plastic deformation is ignored in these tests. Therefore, the results may not emulate the progression of tool wear in sheet metal forming.3
Analysis of the pin-on-disk test is standardized in ASTM G99, "Standard Test Method for Wear Testing with a Pin-on-disk Apparatus," with respect to volume loss.4 The volume loss can be measured directly from the specimen dimensions before and after the test, or it can be calculated from mass loss. If galling is present, volume loss may not reflect the tool wear, so this test method should not be used.5
Twist-compression Test (TCT)
In a twist-compression test (TCT), a rotating button (tool material) is pressed against a fixed metal sheet6 (see Figure 2). Rotation speed and pressure may be adjusted to simulate the metal forming process. However, similar to the pin-on-disk test, the tool material is rotating on the same surface, not on a fresh sheet surface as in metal forming. Thus, surface conditions of sheet metal forming or stamping operations cannot be emulated.
This test is used to evaluate lubricant performance very quickly and to determine threshold galling stress for given sheet and die materials. To evaluate lubricant performance, transmitted torque is recorded in time, enabling the calculation of the change in coefficient of friction () in time. As a rule, when the coefficient of friction reaches 0.3, the test is stopped.7
Strip-reduction Test
In a strip-reduction test, the thickness of a metal strip is reduced while it slides against the tested tool material (see Figure 3). This test is used to determine the galling tendency of a pair of materials (tool and sheet) and to evaluate lubricants.
For the first application, the length of strip that could be drawn using a given tool material without galling is recorded. The results are compared within the evaluated tool materials to determine which tool material and coating are best for drawing and reducing a specific sheet material. The change in the surface finish of the tool after a reduction test can be used as a criterion for evaluating the performance of tool materials, coatings, and lubricants.
Strip-reduction tests include the effect of plastic deformation. Nevertheless, the state of deformation is limited to thickness direction only. However, in deep-drawing operations, the deformation is biaxial, and the sheet material undergoes thinning, thickening, and bending. All of these operations may change the surface texture, which cannot be emulated by strip-reduction tests.8
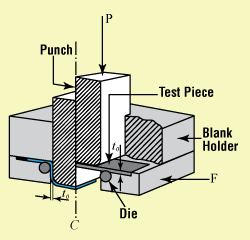
Figure 4 Forming tests, such as the channel forming test, are designed to emulate the actual state of deformation in sheet metal forming processes.
Forming Tests
Forming tests are designed to emulate the actual state of deformation in sheet metal forming processes (see Figure 4). They include strip drawing tests, strip ironing tests, cup drawing tests, draw bead simulations, and part forming tests.
The forming tests are conducted either up to a certain number of pieces or until wear, galling, or scratches are observed in the workpiece. In the first method, the number of parts produced without defects is an indication of tool performance. In the second method, the surface area where galling occurs is measured. These tests can emulate real production conditions as closely as possible, provided that parameters such as press speed, contact pressure, and lubrication are close to values used in actual production lines.9
Notes
- P.J. Blau and K.G. Budinski, "Development and use of ASTM standards for wear testing," Wear 225-229, pp. 1159-1170, 1999.
- E. Van der Heide, A.J. Huis in 't Veld, and D.J. Schipper, "The effect of lubricant selection on galling in a model wear test," Wear 251, pp. 973-979, 2001.
- H. Kim, H. Palaniswamy, and T. Altan, "Investigation of tribological conditions in forming uncoated and galvanized advanced/ultrahigh strength steels, CPF, 2.3/06/01, 2006.
- ASTM G99, "Standard Test Method for Wear Testing with a Pin-on-Disk Apparatus," 2005.
- Ibid.
- Kim, "Investigation of tribological conditions."
- Ibid.
- Ibid.
- Ibid.
About the Author
Eren Billur
1971 Neil Ave. Baker Systems Engineering, Room 339
Columbus, OH 43210
614-292-9267
subscribe now

The Fabricator is North America's leading magazine for the metal forming and fabricating industry. The magazine delivers the news, technical articles, and case histories that enable fabricators to do their jobs more efficiently. The Fabricator has served the industry since 1970.
start your free subscription- Stay connected from anywhere

Easily access valuable industry resources now with full access to the digital edition of The Fabricator.

Easily access valuable industry resources now with full access to the digital edition of The Welder.

Easily access valuable industry resources now with full access to the digital edition of The Tube and Pipe Journal.
- Podcasting
- Podcast:
- The Fabricator Podcast
- Published:
- 04/30/2024
- Running Time:
- 53:00
Seth Feldman of Iowa-based Wertzbaugher Services joins The Fabricator Podcast to offer his take as a Gen Zer...
- Industry Events
Pipe and Tube Conference
- May 21 - 22, 2024
- Omaha, NE
World-Class Roll Forming Workshop
- June 5 - 6, 2024
- Louisville, KY
Advanced Laser Application Workshop
- June 25 - 27, 2024
- Novi, MI
Precision Press Brake Certificate Course
- July 31 - August 1, 2024
- Elgin,

