Group Leader Optical Surface Analytics
- FMA
- The Fabricator
- FABTECH
- Canadian Metalworking
Categories
- Additive Manufacturing
- Aluminum Welding
- Arc Welding
- Assembly and Joining
- Automation and Robotics
- Bending and Forming
- Consumables
- Cutting and Weld Prep
- Electric Vehicles
- En Español
- Finishing
- Hydroforming
- Laser Cutting
- Laser Welding
- Machining
- Manufacturing Software
- Materials Handling
- Metals/Materials
- Oxyfuel Cutting
- Plasma Cutting
- Power Tools
- Punching and Other Holemaking
- Roll Forming
- Safety
- Sawing
- Shearing
- Shop Management
- Testing and Measuring
- Tube and Pipe Fabrication
- Tube and Pipe Production
- Waterjet Cutting
Industry Directory
Webcasts
Podcasts
FAB 40
Advertise
Subscribe
Account Login
Search
Using laser scanning to inspect part cleanliness
Laser-induced fluorescence combines with scanning to create a digital surface contamination map
- By Alexander Blätterman
- August 21, 2023
- Article
- Finishing

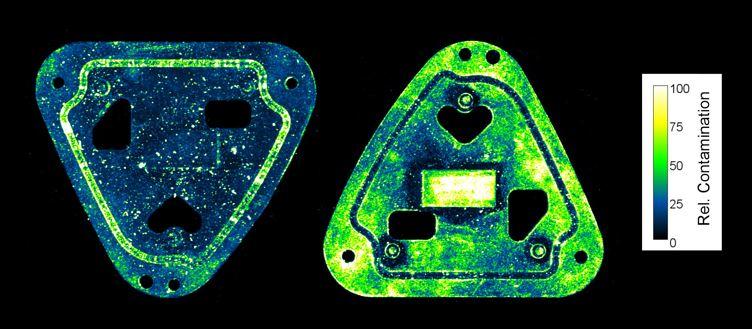
These two identical parts feature a groove for sealant application. The part on the left shows low overall contamination but high contamination in the groove. The part on the right shows the opposite. This demonstrates the power of imaging detection versus integral or spot measurements that might provide misleading results in such situations.
Keeping part surfaces free of contaminants is crucial in many modern manufacturing processes, such as bonding and welding, coating, and vacuum applications. Given this requirement, and with the growing demand for digitalization and documentation of these processes, there’s a real need for measurement equipment that can assess the cleanliness of the entire part.
Laser-Induced Fluorescence
By combining the super-sensitive method of laser-induced fluorescence detection with the concept of laser scanning, Fraunhofer IPM has developed devices for the inspection of parts from less than 1 sq. in. to tens of square feet in size.
One of those devices is the F-Scanner, which uses a violet or ultraviolet laser beam to give fluorescence to organic residues such as drawing and cooling lubricants, slushing oils, release agents, flux, and fingerprints. These contaminants then emit their own light that contrasts against the clean bare metal surface, which itself does not exhibit any fluorescence.
For coatings and known contaminants, the device can be calibrated to obtain quantitative measurement data. Its limit of detection is 0.1 to 1 mg/sq. ft., which corresponds to just a few nanometers of layer thickness. Calibration requires reference values, such as gravimetric measurements using a precision scale. If not calibrated, the unit is factory-set to a fluorescence standard to ensure that results from the same or different units is always comparable.
Powerful scanner optics and fast detection of the fluorescence signal allow the unit to perform more than 1 million individual measurements per second. This is fast enough to keep up with high-speed applications, such as strip metal processing. Based on the measurement data, the software creates a digital map of the contamination or coating landscape across the whole surface. For still-standing parts, the optical resolution depends on the required cycle time and is typically 200 to 1,000 µm.
Stand-Alone and Inline Scanning
The scanner is available in stand-alone and inline versions and also can be integrated into production equipment. The stand-alone version is based on the 2D unit or a traversing 1D unit, depending on the part size. It is equipped with a sample chamber of appropriate size, which ensures Class 1 laser-safe operation.
The inline version, typically based on the 1D unit, offers customizable mechanical, electrical, and software interfaces. Its monolithic design is suitable for operation in both clean and harsh environments and may include a tool-free exchangeable window, water cooling, a purge gas system, and shock absorbers. The Class 3b laser system needs to be enclosed or suitably shielded to ensure laser-safe operation. The system comes with safe inputs and outputs, which can be connected to an interlock logic, and a key-actuated control of the laser.
With a scan rate of up to 400 lines per second, the 1D model can capture parts or strip metal at a processing speed of 150 m/min. with ¼-in. resolution. That equates to more than 2,000 measurements per square foot. It also can be mounted to a robot, linear axis, or gantry, allowing for flexible and high-speed capture of complex parts of nearly arbitrary size, such as from die casting or panel forming processes. For smaller parts of up to 24 by 24 in., the 2D model with its inherent 2D scan mode is most suitable.
Fast and complete fluorescence inspection of part surfaces using laser scanners helps fabricators achieve seamless quality assurance in demanding processes and industries. It can reduce the number of rejects and improve product quality, safety, and lifetime. Moreover, it can pave the way to more sustainable data-based cleaning and coating processes that may benefit from direct feedback of the inspection device.
About the Author
Alexander Blätterman
George-Koehler-Allee 301
Freiburg, 79110 Germany
+49 761 8857 249
subscribe now

The Fabricator is North America's leading magazine for the metal forming and fabricating industry. The magazine delivers the news, technical articles, and case histories that enable fabricators to do their jobs more efficiently. The Fabricator has served the industry since 1970.
start your free subscription- Stay connected from anywhere

Easily access valuable industry resources now with full access to the digital edition of The Fabricator.

Easily access valuable industry resources now with full access to the digital edition of The Welder.

Easily access valuable industry resources now with full access to the digital edition of The Tube and Pipe Journal.
- Podcasting
- Podcast:
- The Fabricator Podcast
- Published:
- 04/16/2024
- Running Time:
- 63:29
In this episode of The Fabricator Podcast, Caleb Chamberlain, co-founder and CEO of OSH Cut, discusses his company’s...
- Trending Articles
Tips for creating sheet metal tubes with perforations

JM Steel triples capacity for solar energy projects at Pennsylvania facility

Are two heads better than one in fiber laser cutting?

Supporting the metal fabricating industry through FMA

Omco Solar opens second Alabama manufacturing facility

- Industry Events
16th Annual Safety Conference
- April 30 - May 1, 2024
- Elgin,
Pipe and Tube Conference
- May 21 - 22, 2024
- Omaha, NE
World-Class Roll Forming Workshop
- June 5 - 6, 2024
- Louisville, KY
Advanced Laser Application Workshop
- June 25 - 27, 2024
- Novi, MI


