- FMA
- The Fabricator
- FABTECH
- Canadian Metalworking
Categories
- Additive Manufacturing
- Aluminum Welding
- Arc Welding
- Assembly and Joining
- Automation and Robotics
- Bending and Forming
- Consumables
- Cutting and Weld Prep
- Electric Vehicles
- En Español
- Finishing
- Hydroforming
- Laser Cutting
- Laser Welding
- Machining
- Manufacturing Software
- Materials Handling
- Metals/Materials
- Oxyfuel Cutting
- Plasma Cutting
- Power Tools
- Punching and Other Holemaking
- Roll Forming
- Safety
- Sawing
- Shearing
- Shop Management
- Testing and Measuring
- Tube and Pipe Fabrication
- Tube and Pipe Production
- Waterjet Cutting
Industry Directory
Webcasts
Podcasts
FAB 40
Advertise
Subscribe
Account Login
Search
Camera-based measurement system sends waves of productivity through fabrication shop
Optical 3-D measurement system accelerates setup, bending, inspection
- By Eric Lundin
- July 31, 2014
- Article
- Testing and Measuring
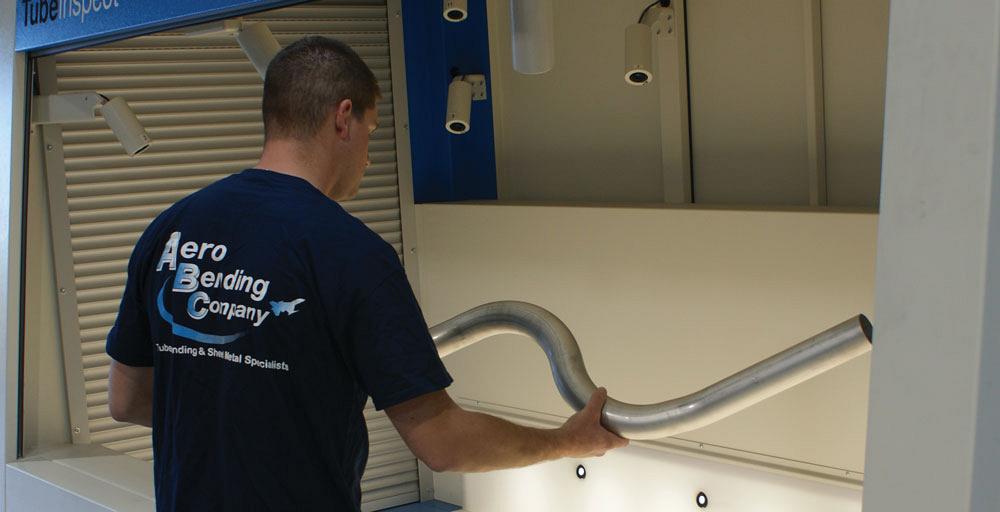
One of Aero Bending’s staff of eight bending machine operators places a bent tube onto the measurement bed of a TubeInspect optical measurement system from Aicon 3D. Because it’s a camera-based system, it instantly measures the entire tube length to create a 3-D image of it.
Bob Burns, owner and president of Aero Bending Co., Palmdale, Calif., experienced a steady growth in business since he purchased the company in 2007, and after moving to a new building to accommodate future growth, he began to evaluate the next equipment investment that would best serve the business. His first idea was to add another tube bending machine. Although the company does quite a bit of sheet metal work and holds a number of welding accreditations and certifications, its bread and butter is tube bending. It specializes in thin-wall tubing from 1⁄16 to 6 inches in diameter in aluminum, titanium, stainless steel, copper, and INCONEL® alloy.
Another rotary draw bender would fit easily into the company’s 33,500-sq.-ft. facility, and it would increase the company’s bending capacity, but it also would require more manpower and support. While walking through the shop, Burns asked one of his lead bender operators what the next investment should be.
“Not another bender,” he said. “We have people standing in line waiting to measure parts now.” Looking across the shop, Burns saw four bending machine operators standing in line, waiting to measure tubes.
As part of its quality system, Aero Bending operators are required to perform in-process measurements to verify that every tube meets the customer’s dimensional criteria. They had to take enough measurements to determine bend end points, straight length end points, and bend radii. A typical tube produced by Aero Bending, one with three to five bends, took between five and eight minutes to measure. The measurement system had become a constraint because of the time it took to measure the tubes for first-piece and in-process inspection
Should the company buy a duplicate measurement system? This would reduce the number of people waiting in line, but it would not improve productivity. It would take the same amount of time to measure a part, and it wouldn’t improve measurement repeatability.
A Camera-based System
After an equipment and process evaluation, Aero Bending invested in TubeInspect, an optical measurement system produced by Aicon 3D Systems. The system is straightforward: The operator places the bent tube on the machine’s measurement bed and initiates the measurement cycle; the eight cameras capture the dimensions in a few seconds, and the system’s software builds a 3-D model of the part. The system feeds that information back to the bending machine, helping to improve the accuracy of future bends.
Aero Bending’s evaluation determined that the machine would make measurements more quickly, improving productivity of the company’s existing equipment and people as well as improving measurement reliability. A key consideration was that it wouldn’t require additional staff.
“It has improved productivity at least 10 times,” Burns said. “The
TubeInspect completes a measurement in 5 seconds or less, eliminating the queue. It also reduced the setup time on the CNC bender. Regarding future growth, I don’t think I have to worry about an inspection machine at this point because the TubeInspect is so fast and can handle all of it.”
Setup, Calibration, Training, and Use
Because the system has no moving parts, setting it up and preparing it was fairly painless. Likewise, because operator action is minimal, training is short and simple.
“It took only a couple of days to set up the machine and calibrate it, and within a day and a half, the training session was done,” Burns said. It went smoothly, in part, because of the similarities between Aero Bending’s original measurement system and the new optical system—steps such as drawing a part, bringing it up on a data screen, interpreting it, and determining how to measure the part.
A big change is the consistency from one operator to the next. The new system removes the human element—it doesn’t rely on the operator to take measurements in specific locations. Because it’s a camera-based system, every operator gets the same measurement result, every time, regardless of experience, even on complex shapes and tubes that have short straight sections, which can be a challenge for conventional systems.
Burns noticed that, for the same reason, it’s more effective at corrections and fine-tuning. Furthermore, it reduces the time needed to dial in the bending machines for each new part, Burns said, because the display gives them a better idea of what they need to change.
Taking Measurements, Bending Tube More Quickly
“The motivation to buy the inspection system was to gain efficiency in measuring tubes as the company was growing,” Burns said. “We wanted a system that would achieve that efficiency in measuring tubes and not sacrifice the accuracy of measurements, but improve on it. We achieved that with this system.”
The new measurement system has a larger role at Aero Bending than the previous measurement system because nearly everyone uses it—engineers, machine operators, and quality control personnel. Bending engineers load the data and the machine operators use it to perform first piece set-ups along with in-process measurements to verify process consistency of the process.
“Operators are able to set up and validate their first articles much faster, but the unexpected benefit came in the inspection area,” Burns said. “We check a lot of tubes in the inspection area, and our inspectors find it much easier to use the new system, even though they have their own equipment in the inspection area. If they want to check a part quickly, they go to the TubeInspect on the production floor because it is much faster.”
Burns noticed that because the optical system is faster than the old one, it has made all of the personnel more productive, but it doesn’t end there. It also has increased the productivity of the bending machines. The queue of bender operators waiting to measure parts has been eliminated, freeing them to bend more parts.
About the Author

Eric Lundin
2135 Point Blvd
Elgin, IL 60123
815-227-8262
Eric Lundin worked on The Tube & Pipe Journal from 2000 to 2022.
About the Publication
Related Companies
subscribe now

The Tube and Pipe Journal became the first magazine dedicated to serving the metal tube and pipe industry in 1990. Today, it remains the only North American publication devoted to this industry, and it has become the most trusted source of information for tube and pipe professionals.
start your free subscription- Stay connected from anywhere

Easily access valuable industry resources now with full access to the digital edition of The Fabricator.

Easily access valuable industry resources now with full access to the digital edition of The Welder.

Easily access valuable industry resources now with full access to the digital edition of The Tube and Pipe Journal.
- Podcasting
- Podcast:
- The Fabricator Podcast
- Published:
- 04/16/2024
- Running Time:
- 63:29
In this episode of The Fabricator Podcast, Caleb Chamberlain, co-founder and CEO of OSH Cut, discusses his company’s...
- Trending Articles
Team Industries names director of advanced technology and manufacturing

3D laser tube cutting system available in 3, 4, or 5 kW
Corrosion-inhibiting coating can be peeled off after use

Zekelman Industries to invest $120 million in Arkansas expansion
Brushless copper tubing cutter adjusts to ODs up to 2-1/8 in.

- Industry Events
16th Annual Safety Conference
- April 30 - May 1, 2024
- Elgin,
Pipe and Tube Conference
- May 21 - 22, 2024
- Omaha, NE
World-Class Roll Forming Workshop
- June 5 - 6, 2024
- Louisville, KY
Advanced Laser Application Workshop
- June 25 - 27, 2024
- Novi, MI


