


Marketing Manager
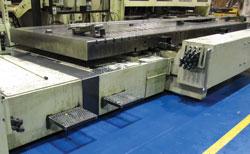
Figure 3: Be sure to keep all the tools you need for die changeover local to the press, near the point of use.
Quick die change (QDC) is not about just changing the die. It’s about the time between the last good part made on a press run and the first good part made on the next press run. The nexus of lean manufacturing, this gap between production runs is key to your plant’s profitability.
It’s not a new idea; every plant manager has heard of SMED, TPS, JIT, and the rest. It’s the goal of every modern manufacturing facility to implement an efficiency system. So why is it not happening in your shop? Well, you might need an easier plan, a simpler way to think about how to eliminate time-wasters.
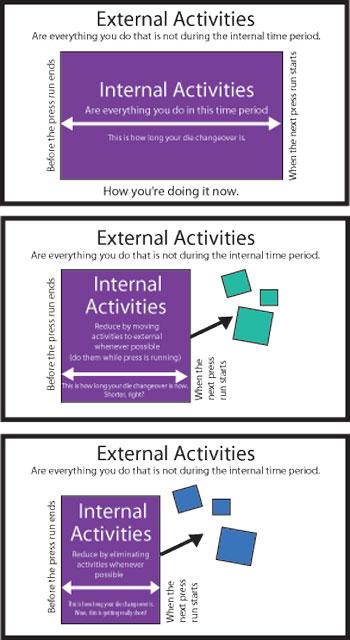
Think of all your activities as having the potential of being contained within one of two time frames. First is the internal time, the period between that last part of a press run and the first good part of the next press run. This is your actual die changeover period. Much like drawing a circle around a vacation week on a calendar, you are marking a box around a particular time during your workday shift (see Figure 1).
During the internal time period, you’ve just finished your run, and the press is idle. You have a whole laundry list of things to accomplish during this time. There may be coil lines to thread, adjustments to make, and lubrication to set up. All of these processes make up that expensive downtime. It’s called die changeover, but the actual changing of the die is just one piece of the pie, and may make up as little as 10 percent of that time.
Everything that happens when the press isn’t running is costing your plant money—and making none. So here’s the goal: Shrink this internal time period as much as possible.
The second time period—the external—is all the time remaining during the shift. Your press is running, the shop is humming, and you’re making money. You have a number of activities going on while the press is in production. But could you have more? Could any of the activities that are going on during the internal time period be moved outside that box? This should be your first step—to move every activity you possibly can from the internal to the external time period.
You need to know what is actually going on during these changeovers. Meet with your staff and put together a committee. Ideally, a process improvement team should include toolmakers, setup mechanics, press operators, engineers, and quality control personnel, as well as top management and accounting. Committees do take up valuable time, so it’s essential to establish clear objectives for this study and assign a project leader. Meet to discuss the overall scope of the study, including timelines and responsibilities for each team member. Keep it lean, short, and sweet.
The committee’s first step is to benchmark current procedures, and for this a video camera is ideal. It’s important that the workers know what you’re trying to accomplish. You want the staff to be comfortable enough to go about their processes normally. Be sure to record more than one changeover so that you can establish a typical changeover and the average amount of time.
Next, review the video and break down the changeover operation into specific tasks with the actual time spent noted and with all time accounted for. This is your internal timeline.
Establish the sequential order of these internal activities, and note a benchmark time frame for all.
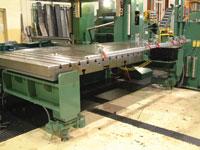
Figure 4: A semiautomatic die changer simplifies setup and reduces press downtime.
Your lean manufacturing plan now can be done in three steps:
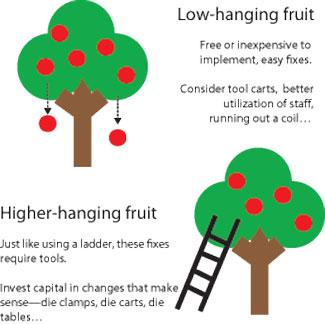
We’re all familiar with the low-hanging fruit analogy (see Figure 2). Pick all of your low hangers off your list and tackle your easiest and most obvious time-wasters. With luck, you may find some of the biggest time-wasters are simple and inexpensive to fix, like these examples:
•Workers leave the press area to search for the proper tool. This problem can be easily and inexpensively solved by designating a dedicated tool cart or area with all the tools and other items needed for changeover near the press (see Figure 3). Don’t forget to have shears near the coil for debanding. Create a ministation for each press.
•Better staff coordination. The machine operator usually cannot do all the prestaging and postchangeover tasks alone, so consider arranging the team so that some members are teamed up like a pit crew at a racetrack. Perhaps one member could handle the coil changeover while the other member locates and clamps the tool in the press. In some cases, you can do this with your existing crew, but adding staff can make a lot of sense. And with the hard numbers coming from a study like this—that is, projections of increased production rates, lower scrap rates, etc.—you may be able to justify increasing staff easily.
•Changing the numbers. Consider running out a coil if you are getting near the end. Is this a part you will be stamping again in the near future? If you have a little space for storing extra parts, you could add these extras to the next run. Sometimes a repeat customer might take a larger shipment one time if it is a part the customer buys often.
Now that you’ve tackled the obvious, next look at standardizing internal activities by eliminating all the adjustments you can. In this case, you’re not moving activities out to the external time period, you’re kicking these tasks out of the process altogether.
How much time is being spent on adjustments? Could any of these activities be automated? Accuracy and repeatability are key to streamlining the changeover process, and while some of this relies on the skill of your personnel, much standardizing of changeover may involve investing in equipment upgrades. This is the step where it will pay off to consult with a tool and die equipment specialist.
With the goal of getting the most out of your existing assets, start with the least expensive changes and look at the easiest product to implement that makes the least amount of change to the press or press line. Your consultant can advise on what add-on equipment will give you the best return on investment.
Adding die lifters often can help cut adjustment time, and easily adjustable or fully automated clamps can simplify the setup. Other options are die subplates, bolster extensions, and a die changer (see Figure 4). Keep in mind that this project of analyzing your die change process may bring other considerations to light, like finding ways to make your shop more ergonomic, thus reducing potential injuries and time lost.
Plant Layout Considerations
How much inefficiency comes from your actual layout? In most cases, the shop layout is legacy, and it’s not practical to change the basic arrangement entirely. But within that layout, look at where you might find a better way to tighten up the processes.
If your worker must find an available forklift driver to move the old die from the press across the length of the shop to storage, return with a new die, and then make another trip to pick up inconveniently located materials, you’re wasting a lot of time. This is where you need to look at investing in die carts and T-tables. The simplicity of having the next die delivered to an area adjacent to the press while the press is still running is a great example of changing an internal process to an external one.
Your tool and die consultant can provide you with a budgetary estimate on appropriate die cart equipment for your layout, and armed with your time study, it should be easy to figure what the savings will be and when you could expect to see the return on investment.
The most complete, and initially the most expensive, option is a fully automated system that can move dies from storage to the press, clamp them, take out the die that’s no longer needed, and store it while staging the next die at the press—all without operator intervention. Typically considered with greenfield sites, or completely new plant construction, this system removes a lot of the potential for error, makes the best use of your shop floor, nearly eliminates wasted internal time, and often provides the best savings over time. Unfortunately, most shops can’t accommodate an extensive system like this, but there still are a lot of automated options available.
Once the plan is set and any new equipment is in place, set aside time for employee training and practice on new processes. Expect a breaking-in period while staff becomes accustomed to the changes, keeping in mind that most people are creatures of habit. Management can play a key role in keeping momentum and preventing employees from going back to the old ways.
As your staff comes to realize that many of their tasks have been simplified or made more ergonomic, they will be less resistant to new methods. But don’t be afraid to make adjustments to your die change process. After all, continuous improvement is a great path to be on.
Improvement Checklist


The Fabricator is North America's leading magazine for the metal forming and fabricating industry. The magazine delivers the news, technical articles, and case histories that enable fabricators to do their jobs more efficiently. The Fabricator has served the industry since 1970.
start your free subscription
Easily access valuable industry resources now with full access to the digital edition of The Fabricator.

Easily access valuable industry resources now with full access to the digital edition of The Welder.

Easily access valuable industry resources now with full access to the digital edition of The Tube and Pipe Journal.

Easily access valuable industry resources now with full access to the digital edition of The Fabricator en Español.
In this episode of The Fabricator Podcast, Caleb Chamberlain, co-founder and CEO of OSH Cut, discusses his company’s...


