Cut it out: An intro to plasma cutter patterns
An intro to plasma pattern cutting
With a plasma cutter and grinder, you can unleash your inner artist and sculpt metal art.
Perhaps the easiest way to perform artistic plasma cutting, or to cut identical pieces, is to use a CNC plasma cutting table and a computerized art file. While tables can be purchased for about $20,000, if you don't have one, all is not lost. This article describes a simple art project and offers some tips to maximize your hand-held plasma cutting efforts.
Your artwork's design, of course, will be up to you. Once you've developed your design, either by hand or using a graphics program, you need to transfer it to your work metal. There are various methods to do this. One way is to trace a cardboard cutout. Or you can transfer your sketch with carbon paper and trace it with a black marker so you can see it easily while cutting. Carbon paper is available at art supply stores.
Selecting a Plasma Cutter
If you haven't already chosen a plasma cutter, there are a few considerations to keep in mind when doing so. Probably the most important is the machine's cut rating, which is the thickness of material that may be cut cleanly when traveling at about 10 inches per minute (IPM). The cut rating is in direct proportion to the machine's output amperage.
Choose a plasma cutter that cuts the metal thickness you'll use most often. There is an exception, however. If you begin many of your cuts by piercing the metal, instead of starting from an outside edge, choose a machine capable of cutting twice the thickness you'll need. It's important to pierce the material quickly, or molten material can splash back into the torch tip and shorten tip life.
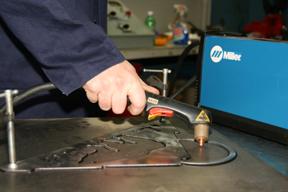
The choice of plasma cutter also affects the type of tips that can be used. For plasma cutters rated below 40 amps (about a 5/8-inch cut rating), the cutting tip can rest directly on the metal when cutting (see Figure 1). When you cut with 40 amps or more, resting the cutting tip on the metal can cause double-arcing and quickly damage the tip. Because of this, maintain a standoff distance between 1/16 and 1/8 in., or use a drag shield, which rests on the material surface and maintains proper standoff during the cut.
If you're designing a template for repeatable cuts, you'll have to account for the radius of the tip in your calculations.
The Plasma Cutter Art Work Area
A lightweight setup provides a good work area yet can be easily stored when not in use. In this case, blocks of metal on the table raise the workpiece and still maintain good electrical contact. The hole and fan draw fumes away from the operator, while an arrestor in the fan unit contains the sparks.
Plasma Cutter Patterns and Templates
If you're designing a piece to be used as a template, you need to account for the radius of the cutting tip or drag shield in your initial design. For example, to cut the circle (solid line) from a piece of metal, draw your template to the size of the dotted blue line.
In addition, the thickness of the template material should be approximately in. This is to provide a firm vertical surface for the side of the tip to press against without slipping.
Being Safe
Familiarize yourself with the machine's owner's manual, paying particular care to the safety section. Among the requirements are wearing gloves, long sleeves, and an appropriate pair of shaded safety glasses.
Figure 1: For machines rated for less than 40 amps, a cutting tip can be placed directly on the work while cutting.
Setting up the Materials
Place the template and workpiece on metal blocks and securely clamp them to the worktable. Secure a ground clamp to the table for a good electrical connection to the workpiece. Although a plasma cutter can cut through paint, the connection from the ground clamp to the workpiece should be free of paint or other contaminants.
If you have tight angles in the design, some of the cuts will need to be made by hand, so use a marker to outline the design.
Starting the Plasma Cut
When piercing the metal at the beginning of a cut, start at a piece outside the design and hold the torch at an angle, as shown in. Push the trigger and roll the gun until it's perpendicular to the metal. Then move to the side of the template and begin cutting.
Remember to keep the gun perpendicular while cutting. If the gun is angled, it will create a beveled edge. If you can't see the cutting arc, angle your head to the side for a better view.
Use your non-cutting hand as a brace to maintain the proper position. Rehearse beforehand to ensure you can make the cut without changing positions.
Cut all the areas you can using the template. After this, remove the template and, following the outline, hand-cut all areas too small for the template to accommodate.
Plasma Cutter Art Cleaning up
Using a piece of scrap metal, knock off the dross that remains after the cut.
Clean up rough edges with a grinder to finish the piece. With that, you should have a completed, aesthetically pleasing, plasma-cut work of art.
About the Author
About the Publication

subscribe now

The Welder, formerly known as Practical Welding Today, is a showcase of the real people who make the products we use and work with every day. This magazine has served the welding community in North America well for more than 20 years.
start your free subscription- Stay connected from anywhere

Easily access valuable industry resources now with full access to the digital edition of The Fabricator.

Easily access valuable industry resources now with full access to the digital edition of The Welder.

Easily access valuable industry resources now with full access to the digital edition of The Tube and Pipe Journal.

Easily access valuable industry resources now with full access to the digital edition of The Fabricator en Español.
- Podcasting

In this episode of The Fabricator Podcast, Caleb Chamberlain, co-founder and CEO of OSH Cut, discusses his company’s...