


Sales Representative
In this business, grinding is where the rubber hits the road, or more precisely, where the grain hits the metal. At every process upstream, most precision sheet metal fabricators employ at least some level of automation. But there’s no getting around it: Grinding down a weld on a formed workpiece is and probably will remain an intensely manual operation.
The act of grinding can be deceivingly simple. But the devil’s in the details. Effective grinding requires operators to apply enough pressure at the correct angle to let the grains—the “cutting tool” of a grinding disc—remove the most metal in the shortest time, while not prematurely wearing the disc or burning out the grinding tool.
The variables abound, and managing them effectively can be vital for efficient part flow. After all, it doesn’t matter how mind-bogglingly fast upstream processes are if it takes forever and a day for parts to make it through the grinding department.
This subject could fill an entire book, of course. But as a starting point, here are 8 tips that may help you make the most effective use of your grinding operation. These factors just scratch the surface (so to speak), but they may give you some initial ideas on how to free your grinding bottleneck.
1. Use the right tool for the job. Grinding discs are consumables; the power tools shouldn’t be. Be sure to use the appropriate grinder that can handle adequate amperage for the job at hand. If an application calls for between 8 and 10 amps of pressure, and you use a right-angle grinder rated for only 6 amps, you’re in trouble from the start.
A grinder shouldn’t be a throwaway tool, and it makes business sense to spend a little more money on a higher-quality tool rated for industrial work. A grinder twice the price will give you better results, and its operating life may be measured in months or even years, not weeks.
Besides, high-quality grinding discs as well as flap discs work with right-angle grinders as a system. An old jalopy (that is, a low-quality grinder) with fancy tires (high-quality grinding disc) may drive a little better, but it’s still not the smoothest ride.
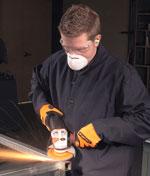
2. Be safe. Using the right tool for the job promotes safe operation. So many operators use grinders without guarding. This opens the door for potential injury, not to mention a hefty fine if OSHA comes knocking. Yes, the guard can be a slight nuisance in some circumstances, but without guarding that nuisance could turn into a serious emergency.
It can become an even greater nuisance if you have an underpowered or, worse yet, the completely wrong tool for the job. If you need to grind in tight areas, don’t take the guard off and squeeze in a right-angle grinder. Use the right tool, like a file grinder. It gets the job done faster and, most important, safer.
Also, when changing out the abrasive media, unplug the tool first. To replace the media, try turning the head of the power tool up so you can lock the key button, rest the tool on your forearm, then take the abrasive off while it’s facing up. This gives you better control during an abrasive changeout, and prevents you from dropping the abrasive.
In fact, dropping the abrasive is one of the most overlooked causes of abrasive failure—and a disc that falls apart in a high-RPM right-angle grinder can be quite dangerous. Even the smallest crack can cause a disc to break apart during operation. All too often operators drop a disc, inspect it, and then put it on the grinder, only to have the disc fly apart.
3. Look at the spark flow. In an ideal world, every shop would have an ammeter handy. Hooked to the tool, an ammeter reveals whether the operator is pushing too hard or not hard enough. The pressure can change depending on what the tool and grinding wheel are rated for, but optimal pressure in a general industrial grinding application usually draws between 8 and 10 amps. If the ammeter reads below this range, you aren’t pushing hard enough; if the meter reading exceeds this, you need to lighten up a bit.
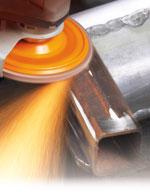
Of course, this isn’t an ideal world, and most shops don’t have the luxury of an ammeter. But every metal grinding application produces sparks, and the flow of those sparks can be read as a visual ammeter of sorts.
Exactly how those sparks from the workpiece flow can tell you a lot about how effective the grinding really is. In most applications, sparks should flow about 3 to 4 feet away from the workpiece, in a consistent manner. This shows that the grains on the grinding wheel are doing what they’re supposed to be doing—removing excess weld metal.
If you push too hard or aren’t pushing hard enough, the spark flow won’t be as pronounced. Pushing too hard overloads and overheats the disc, causing the grains to glaze over and become smooth. The grains are no longer cutting into much weld metal, which in turn reduces spark production. Similarly, if you don’t push hard enough, the grains don’t fully engage the workpiece, so they don’t remove much weld metal with every disc rotation.
4. Listen to the grinder. A grinder’s sound can indicate similar problems. When engaged properly, the grinder should emit a sound with a somewhat constant pitch. If the pitch goes lower, you’re overworking the tool; if the pitch goes higher, you probably need to apply a little more pressure.
A low pitch often will dip repeatedly, sounding a little like a paper shredder that’s trying to chew up too many papers at once. The remedy here: Lighten up a bit. That’s a key sign that the power tool is being overworked. Similarly, a high pitch will tend to skip or chatter as the grinding disc bounces across the ridges of the excess weld metal. The remedy here: Push a little harder.
5. Pay attention to your working angle. Generally, grinding discs are designed to be used at a working angle that’s 5 to 10 degrees from horizontal, and the wear pattern on the disc face circumference should be about double the disc thickness. If the disc is 0.25 inch thick, then a 0.5-in.-wide wear pattern should be showing on the wheel. If the wear pattern is, say, 0.75 in., your approach is too flat, which means too many of the grinding disc’s grains are engaging at once. If the pattern is only 0.25 in. wide, your angle of approach is too high.
6. Keep consistent pressure throughout. When it comes to technique, grinding down a weld is pretty straightforward: Move the disc (again, angled 5 to 10 degrees from horizontal) forward and backward. That’s Grinding 101. But the way you apply that can be at least one root cause for trouble.
You might naturally apply more pressure as you push the disc forward and then lighten up the pressure pulling the disc back. The excess pressure going forward overheats and glazes the disc grains. You may even see the disc’s edge turn an orange color. Then you lighten up on the backstroke and hear chatter. This actually gives you the worst of both worlds. You’re overheating moving forward and then bouncing the disc off the surface on the way back. After all that effort, you really haven’t removed that much weld metal.
Effective grinding requires a constant pressure going backward and forward, again, not excessively hard or light. You want to apply enough pressure to let the disc’s grains do the work, but no more.
7. Adapt your technique and consumables for the material. Moving the disc back and forth works best for many conventional mild steels, but it may not work best for all metals. Take stainless steel. Ask any machinist about stainless, and he’ll say how gummy the material is, and as such has much different machining characteristics.
Grinding basically is a machining operation; the cutting edges (that is, the grains) and chips are just smaller. Just as different cutting tools are designed for different applications, different grinding discs are designed for different metals. For instance, some welds in high-strength, abrasive-resistant steels have been known to be ground down best with specialized discs that can “chisel” or “chew” away at the hard, high-tensile weld metal. Note, though, that this kind of selection is application-specific. Be sure to check with your abrasive disc representative, who should be able to recommend the best disc for the job at hand.
When you change material, your grinding technique can change. For instance, because stainless steel conducts heat the way it does, a grinding wheel can heat up and blue the metal surface before you know it. If it’s a cosmetically important area, you may need to go back and regrain or polish the entire surface.
Instead of pushing forward and pulling back the grinding disc over the gas tungsten arc weld seam, just pull—almost like you’re “combing down” the excess weld metal. This pull-lift-and-repeat method tends to remove stainless and certain aluminums more efficiently. It also gives the workpiece a moment to cool between grinding strokes, which can minimize or eliminate that all-too-common bluing effect on the metal surface.
8. Think carefully about reducing steps. If a part will eventually be prepped for paint, you may use a large-grit grinding disc to knock down the weld, then a 60- or similar-grit abrasive to reduce the Ra, or the average scratch depth. The steps can be critical. Every scratch an abrasive disc places in the metal must subsequently be removed by a finer-grit media, and if you jump from a very coarse disc all the way down to a fine-grit media, troubles can arise. If you stop too early, you may not have given the grit time to remove the deep scratches put on by the coarse-grit disc. The result: Paint doesn’t adhere to the surface, and the part is sent back for rework.
Depending on the application, though, you may be able to reduce grinding steps with the right abrasive media. Certain flap discs, for instance, may reduce or eliminate additional finishing steps, depending on the application.
The flap disc has a series of abrasive flaps overlapping each other. This allows it to squeeze a lot of cutting points (that is, grains) in a small area, giving it aggressive cutting action. But because the flaps aren’t held rigidly in place, they don’t cut as deep into the material with a single pass. This is why a specific flap disc can remove weld metal at the same rate as, say, a conventional 36-grit grinding disc would, while leaving a final finish of a 60-grit material.

The Fabricator is North America's leading magazine for the metal forming and fabricating industry. The magazine delivers the news, technical articles, and case histories that enable fabricators to do their jobs more efficiently. The Fabricator has served the industry since 1970.
start your free subscription
Easily access valuable industry resources now with full access to the digital edition of The Fabricator.

Easily access valuable industry resources now with full access to the digital edition of The Welder.

Easily access valuable industry resources now with full access to the digital edition of The Tube and Pipe Journal.

Easily access valuable industry resources now with full access to the digital edition of The Fabricator en Español.
In this episode of The Fabricator Podcast, Caleb Chamberlain, co-founder and CEO of OSH Cut, discusses his company’s...


