A briefing on portable milling tools:
8 simple rules to do the job
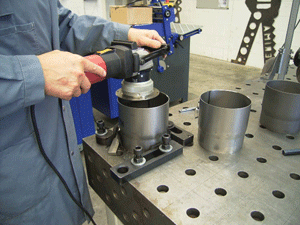
The traditional methods of torch cutting and grinding bevels and radius edges are being challenged today by portable milling machines.
Portable milling tools cut bevels, chamfers, and radius edges on straight or contoured edges of plate and are primarily used for deburring, weld prep, and paint prep. These tools typically use coated carbide inserts in various shapes, allowing for milling on straight plate, contoured plate, and pipe.
Typically, it is only cost-effective to mill material that is 1 inch thick or less when using carbide inserts. However, a large variety of materials can be milled, including carbon steel, stainless steel, aluminum, copper, and other alloy mixtures of manganese, nickel, or titanium. One major benefit in milling is that no heat is transferred to the workpiece, which is an important factor when processing thin-gauge material that helps to prevent warping.
1.
Before milling, however, it is important to understand how to operate the tool properly. Here are some rules to consider prior to and during use.
Ease Into the Workpiece With a Steady, Forceful Hand. Carbide inserts are very hard, but in most cases are also quite brittle. The No. 1 reason for dulled or chipped inserts is chatter or interruption of cut. Most frequently both of these phenomena occur at the very beginning of the cutting process when the tool initially engages the workpiece.
2.
Stay Within the Maximum Depth Limit. If you have ever tried milling a depth of more than in. in the first pass, you have either struggled to keep the machine steady or have, at the very least, slowed your forward movement significantly. If the goal is to keep up with or be faster than a traditional method (grinding or torch beveling), then a -in. depth in the first pass is a good upper end limit to keep to.
3.
Take More Than One Pass. Most people try to remove more material than they should to get the job done faster. Of course, it depends on the material you are processing, but generally, it is better to remove less material than more because it will improve your insert life and make it easier for you to handle the tool's torque when cutting.
4.
Keep Moving. This cannot be emphasized enough. The quickest way to dull an insert is to stand still or rest on the workpiece while the tool is still engaged and cutting. If you get tired, you should pull back from the workpiece and rest. Don't rest and let the tool spin in place. The more consistent your travel speed, the longer the inserts will last.
5.
Speed up for Soft Materials, Slow Down for Hard Materials. With the advent of variable-speed control of the milling heads, you can "dial in" the proper speed for whatever material is being processed. The same principles that apply to CNC machines also apply to portable milling machines. In general, mild steel is considered a midpoint for measuring hardness. If the material is harder than mild steel, like stainless steel, then slow down your milling speed. If the material is softer, like aluminum, you can increase the milling head speed. The biggest benefit to variable-speed control is optimizing the life of your inserts.
6.
Lubricate Your Cutting Surface. Different shops have different policies about when and how to use lubricants when preparing edges for weld prep. But it is a proven fact that a wet edge helps to preserve the cutting edge of the insert. The lubricant helps keep the chip from adhering to the work surface and prevents it from building up on the insert cutting edge. This is especially true for harder materials and alloys like INCONEL® and stainless steel, which have a tendency to become molten. Combined with the proper feed and speed rates, you can increase the distance traveled before indexing by using lubricant.
7.
Give It a Rest. If you intend to use a hand tool continually, then it is best to have more than one tool per job. All electrical motors and all portable tools, no matter what the application, should be assigned a duty cycle and be rotated in and out of service throughout the day to optimize the life of the motor. Commonly, a duty cycle of 70 percent/30 percent is appropriate for hand tools—that is, two, three-hour sessions of usage combined with two, one-hour periods of rest per eight-hour shift.
8.
Safety Comes First. It should go without saying how important it is to wear safety glasses or a face shield, gloves, and an apron when milling. Milling creates small metal chips, like paper confetti, that get sprayed everywhere when you are making a cut. These metal chips can average 1,500 degrees F as they leave the work surface. If these hot metal chips can burn through and ruin your clothing, imagine what they could do to your face or eyes!
About the Author
About the Publication

subscribe now

The Welder, formerly known as Practical Welding Today, is a showcase of the real people who make the products we use and work with every day. This magazine has served the welding community in North America well for more than 20 years.
start your free subscription- Stay connected from anywhere

Easily access valuable industry resources now with full access to the digital edition of The Fabricator.

Easily access valuable industry resources now with full access to the digital edition of The Welder.

Easily access valuable industry resources now with full access to the digital edition of The Tube and Pipe Journal.

Easily access valuable industry resources now with full access to the digital edition of The Fabricator en Español.
- Podcasting

In this episode of The Fabricator Podcast, Caleb Chamberlain, co-founder and CEO of OSH Cut, discusses his company’s...
- Trending Articles
1
Sheffield Forgemasters makes global leap in welding technology

2
Welding student from Utah to represent the U.S. at WorldSkills 2024

3
Lincoln Electric announces executive appointments

4
Lincoln Electric acquires RedViking

5
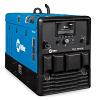
Engine-driven welding machines include integrated air compressors